Cooking Substitutes is a blog dedicated to exploring suitable alternatives in recipes, providing helpful how-to guides, and sharing mouthwatering recipes.
We're here to make your culinary adventures even more delightful!
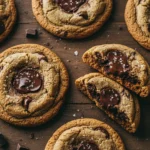
How I Finally Made Bakery Style Chocolate Chip Cookies at Home (And You Can Too)
 1")
I’ve eaten a lot of cookies in my life. Hotel lobbies, airport terminals, farmer’s markets in three different countries. But nothing — nothing — ever hit the same as those massive, thick bakery style chocolate chip cookies sitting behind the glass case at a good bakery. Golden on the outside, soft and gooey in the middle, loaded with chocolate, and somehow always just a little bit better than anything I made at home.
That bothered me for years. I’m a professional cook. I’ve made pasta from scratch on a camping stove. I’ve baked bread in a toaster oven in a Airbnb. Why couldn’t I crack the code on bakery style chocolate chip cookies?
Well, I finally did. And honestly? Once I understood what bakeries actually do differently, it all clicked. I’m going to walk you through every single thing I learned — including the mistakes I made so you don’t have to.
What Makes Bakery Style Chocolate Chip Cookies Different?
This is the question I kept asking myself. I’d make a batch from some random recipe online, they’d spread flat and taste fine. But fine isn’t what I was going for.
Here’s what I figured out after way too many test batches:
 2")
Bakery cookies use more dough per cookie.
We’re talking 3–4 tablespoons of dough, not one. That’s what gives you that thick, tall profile. Most home recipes scoop way too small.
They use bread flour or a mix.
Bread flour has more protein, which means more gluten development, which means chewier cookies. I spent so long using only all-purpose flour and wondering why my cookies never had that chew.
They brown the butter.
I resisted this for the longest time because it felt like an extra step. Then I tried it once and I genuinely could not go back. Browned butter adds this deep, nutty, almost toffee-like flavor that transforms a good cookie into a great one.
They chill the dough.
 3")
Not for 30 minutes. For real. At least overnight. I know, I know. But those 24 hours do something magical to the flavor and texture. The dough dries out slightly, concentrates the sugars, and the result is a cookie with deeper flavor and a better chew.
They use two kinds of sugar.
Brown sugar for moisture and chew. White sugar for crisp edges. Get that ratio right and you’re already ahead of 90% of home bakers.
Once I understood all of this, my thick bakery style chocolate chip cookies went from good to genuinely incredible.
Ingredients You’ll Need
For the Cookies:
- 2 ¼ cups bread flour (or all-purpose flour — see my notes below)
- 1 teaspoon baking soda
- 1 teaspoon fine sea salt
- 1 cup (2 sticks) unsalted butter
- 1 cup packed light brown sugar
- ½ cup granulated white sugar
- 2 large eggs, room temperature
- 1 egg yolk (extra — this is key!)
- 2 teaspoons pure vanilla extract
- 2 cups semi-sweet chocolate chips (I use a mix of chips and chopped chocolate chunks)
- Flaky sea salt for finishing (optional but please don’t skip it)
Why the Extra Egg Yolk?
Egg yolks add fat and richness. That extra yolk is one of those little tweaks that makes a huge difference in how fudgy and rich the inside of your big chocolate chip cookies turns out. I tried this once on a whim and it became a permanent part of my recipe.
How to Make Bakery Style Chocolate Chip Cookies — Step by Step
Step 1: Brown the Butter (Don’t Skip This)
This is the step that changed everything for me. In a light-colored saucepan (so you can see the color change), I melt both sticks of butter over medium heat. I stir it constantly and watch it carefully. It goes from melted to foamy to starting to smell nutty. Then little brown bits form at the bottom. That’s what you want.
The whole process takes about 5–7 minutes. The moment it smells like toasted nuts and turns a deep amber color, I immediately pour it into a large mixing bowl so it stops cooking.
I let the browned butter cool to room temperature — usually about 20–30 minutes. You do NOT want to mix hot butter with your sugars. I made that mistake once and ended up with scrambled eggs in my cookie dough.
Chef Amina’s Speed Hack: I brown the butter the night before and leave it covered on the counter. By the next morning it’s solidified slightly, which actually makes it even easier to cream with the sugars.
Step 2: Mix the Sugars Into the Butter
Once the butter is cooled, I add both sugars directly to the bowl and whisk them together vigorously by hand for a full 2 minutes. You want this mixture to look lighter in color and slightly fluffy before you move on. This step matters more than people think.
Step 3: Add the Eggs
I add the eggs one at a time, whisking after each one, then add the extra egg yolk. Then in goes the vanilla. I whisk again until the mixture is smooth and glossy — almost like caramel in color and texture.
Step 4: Add the Dry Ingredients
In a separate bowl, I whisk together the bread flour, baking soda, and salt. Then I add it to the wet mixture and fold it in with a rubber spatula until just combined. I stop the second I don’t see dry flour streaks anymore. Overmixing = tough cookies. Been there, done that.
Step 5: Fold In the Chocolate
This is my favorite part. I add the chocolate chips and chunks and fold them in gently. I always use a combination of chips and chopped chocolate. The chopped chocolate melts into puddles inside the cookie, and those puddles are everything.
Step 6: Chill the Dough (The Most Important Step)
I cover the bowl tightly with plastic wrap and put it in the fridge for a minimum of 24 hours. 48 hours is even better. I know this feels like forever. But I promise you it makes a difference you can actually taste. The flavor deepens, the texture firms up, and the cookies spread less and hold their thick shape better when baking.
If you absolutely must bake same-day, chill for at least 2 hours. The cookies will still be good, just not at their peak.
Step 7: Scoop the Dough
This is where bakery style cookies get their signature size. I use a large 3-tablespoon scoop (the OXO Large Cookie Scoop — more on that below) for each cookie. Big. Tall. Generous.
Once scooped, I roll each ball gently between my palms to smooth it out. Then I place them on a parchment-lined baking sheet, at least 3 inches apart. These spread. Give them room.
Pro tip: I press a few extra chocolate chips into the top of each dough ball before baking. This gives them that gorgeous, professional look with chips visible on the surface.
Step 8: Bake
I preheat my oven to 375°F. That’s slightly higher than most cookie recipes call for, and it’s intentional. The higher temp helps the edges set faster while the center stays soft and gooey.
I bake for 11–13 minutes. The edges should look set and lightly golden. The centers will look underdone and soft. That’s perfect. Pull them out.
Then I do something that sounds weird but works: I immediately bang the baking sheet on the counter once or twice. This deflates the cookies slightly and creates those beautiful wrinkly, crinkly tops you see on bakery cookies.
Step 9: Finish with Flaky Salt
Right out of the oven, while the cookies are still hot, I sprinkle just a pinch of flaky sea salt on each one. It melts in slightly, hits every bite, and creates that contrast of sweet and salty that makes these bakery chocolate chip cookies completely unforgettable.
Let them cool on the baking sheet for at least 10 minutes before eating. They continue to set up as they cool.
 4")
Bakery Style Chocolate Chip Cookies
Course: DessertCuisine: AmericanDifficulty: IntermediateServings
18
large cookiesPrep time
20
minutesCooking time
13
minutesCalories
320
kcalChilling Time
24
hoursThese are thick, chewy, browned-butter chocolate chip cookies loaded with semi-sweet chips and chocolate chunks. They’re tall, golden-edged, and gooey in the center — just like the best bakery style cookie recipe you’ve ever had.
Ingredients
- For the Cookies:
2 ¼ cups bread flour (or all-purpose flour)
1 teaspoon baking soda
1 teaspoon fine sea salt
1 cup (2 sticks / 227g) unsalted butter
1 cup packed light brown sugar
½ cup granulated white sugar
2 large eggs, room temperature
1 large egg yolk (extra)
2 teaspoons pure vanilla extract
1 cup semi-sweet chocolate chips
1 cup chopped chocolate (from a bar — roughly chopped)
Flaky sea salt for finishing
Directions
- In a light-colored saucepan over medium heat, melt the butter, stirring constantly until it turns a deep amber and smells nutty, about 5–7 minutes. Pour into a large mixing bowl immediately. Let cool to room temperature (20–30 minutes or overnight).
- Add both sugars to the cooled browned butter. Whisk vigorously by hand for 2 full minutes until the mixture looks lighter and slightly fluffy.
- Add eggs one at a time, whisking after each addition. Add the extra egg yolk and vanilla. Whisk until the mixture is smooth and glossy.
- In a separate bowl, whisk together the flour, baking soda, and salt.
- Add the dry ingredients to the wet ingredients and fold with a rubber spatula until just combined — stop as soon as you see no dry flour streaks.
- Fold in the chocolate chips and chopped chocolate.
- Cover the bowl tightly with plastic wrap and refrigerate for at least 24 hours (48 hours is better).
- When ready to bake, preheat oven to 375°F. Line a baking sheet with parchment paper.
- Scoop dough into 3-tablespoon balls. Roll gently between your palms. Place 3 inches apart on the baking sheet. Press a few extra chocolate chips into the tops.
- Bake for 11–13 minutes until edges are golden and set but the center still looks slightly underdone.
- Immediately bang the baking sheet on the counter once or twice.
- Sprinkle with flaky sea salt right out of the oven.
- Cool on the baking sheet for 10 minutes before moving. They are best eaten day 2!
Notes
- The overnight chill is the single biggest thing you can do to improve these cookies. If time allows, always let the dough rest at least 24 hours — it deepens the flavor and improves the texture dramatically.
What Kind of Chocolate Chips Do Bakeries Use?
This is a question I had for years. The answer is simple: they use a combination, and they use good quality.
Most professional bakeries use a mix of semi-sweet chips AND chopped chocolate from high-quality bars. Chips are formulated to hold their shape. Chopped chocolate melts into pockets and puddles. Together, they create the best of both worlds.
I personally love Ghirardelli semi-sweet chips combined with a roughly chopped bar of Trader Joe’s 72% dark chocolate. The difference between using a good chocolate bar versus cheap chips is genuinely noticeable.
 5")
Chef Amina’s Ingredient Substitute Guide
I have been caught without the right ingredient more times than I can count. Here’s what I’ve tested and what actually works:
 6")
No bread flour?
Use all-purpose flour. Your cookies will be slightly less chewy and a bit more tender, which some people actually prefer. Add 1 tablespoon of cornstarch to the all-purpose flour for a softer texture.
Out of brown sugar?
Mix 1 cup of white sugar with 1 tablespoon of molasses. It’s not instant, but it works. I keep a bottle of molasses in my pantry specifically for this. If you don’t have molasses either, all white sugar will work — your cookies will be crispier and lighter in flavor.
No vanilla extract?
A tiny bit of almond extract (just ¼ teaspoon) adds a beautiful depth. Maple extract also works surprisingly well — it gives the cookies a warm, slightly caramel-like note.
Can’t find semi-sweet chips?
Chop up any chocolate bar you have. Milk chocolate makes the cookies sweeter and more gooey. Dark chocolate gives them a more sophisticated, slightly bitter edge. I’ve used both and loved both.
No unsalted butter?
Use salted butter and cut the added salt in the recipe down to just ¼ teaspoon. The cookies will taste slightly different — a bit more salty-sweet — but it works just fine.
No eggs?
For each egg, I’ve used ¼ cup of plain full-fat yogurt in a pinch. It changes the texture slightly — a bit more cakey — but the flavor is still great. Flax eggs (1 tablespoon flaxseed meal + 3 tablespoons water, rested for 5 minutes) work for a vegan version too.
Chef Amina’s Real Talk on Substitutes:
When I first started cooking, I thought every substitution would ruin a recipe. Years of cooking in unusual kitchens all over the world taught me otherwise. Adaptations are how you learn. The worst case scenario is usually just a slightly different but still delicious result.
Why Do My Cookies Spread Flat Instead of Staying Thick?
This was my biggest struggle for years. Here are the real culprits I found after trial and a whole lot of error:
Warm butter. If your butter is too soft or melted (not browned and cooled), the cookies will spread immediately in the oven. Browned butter that has been cooled to room temperature is the sweet spot.
No chill time. Cold dough spreads slower. When you skip the chill, the butter melts before the cookie sets, and you get a flat, crispy result.
Too much white sugar. White sugar promotes spread. That’s why the ratio of brown-to-white matters. In my recipe, brown sugar is always the dominant sugar.
Wrong oven temperature. An oven that runs cool bakes the cookies too slowly, giving the butter time to spread out before the dough sets. Use an oven thermometer — most ovens run 25°F off from what the dial says. Mine was running 30°F cold and I had no idea for years.
Old baking soda. Baking soda loses its potency over time. If yours has been open for more than 6 months, replace it. I test mine by dropping a small amount in hot water — if it doesn’t bubble vigorously, it’s done.
🍪 3 Tools That Speed Up Bakery Style Chocolate Chip Cookies
Honestly, before I had the right tools, making big bakery style cookies was more work than it needed to be. Here are three things that genuinely changed my baking game:
 7")
1. OXO Good Grips Large Cookie Scoop
 8")
Why I Use It: This is the tool that finally gave me bakery-sized cookies consistently. The large scoop holds exactly 3 tablespoons of dough and yields a 3.5-inch cookie — that thick, impressive size you see in actual bakeries. Before I had this, I was using a spoon and guessing, and half my cookies came out different sizes and baked unevenly.
The spring-loaded handle ejects even stiff, chilled dough cleanly with one squeeze. I’ve used cheaper scoops before and they always broke or bent on cold dough. This one just keeps going.
Best For: Anyone who wants perfectly uniform, bakery-sized cookies every single time. Also great for portioning muffin batter and scooping meatballs.
Safety Feature: The soft, non-slip grip absorbs pressure so your hand doesn’t ache after making a big batch. The stainless steel scoop won’t rust or corrode.
Accessibility Feature: The squeeze-style handles work with your whole hand — no awkward thumb pressure — which makes it easy to use even for extended baking sessions or if you have hand stiffness.
👉 Check the OXO Good Grips Large Cookie Scoop on Amazon
2. Nordic Ware Naturals Half Sheet Pan
 9")
Why I Use It: I used to bake on those cheap, thin, dark baking sheets that came in packs of three. My cookies either burnt on the bottom or spread weird because the pan warped in the heat. The Nordic Ware half sheet pan changed all of that.
This pan is made from natural aluminum, which heats evenly and doesn’t create hot spots. The light color reflects heat instead of absorbing it, so the bottoms of my cookies get golden-brown instead of dark and overdone. It’s made in the USA, never warps, and after years of use mine still looks almost new.
Best For: Anyone serious about baking. This is the same type of pan professional bakeries use. If you’re going to make thick bakery style cookies that bake evenly, this is the pan.
Safety Feature: No PFAS, PTFE, or PFOA coatings to worry about — it’s natural, uncoated aluminum. Oven safe to 500°F.
Accessibility Feature: The reinforced steel rim makes the pan rigid and easy to grip with oven mitts, even when it’s fully loaded with cookies.
👉 Check the Nordic Ware Naturals Half Sheet Pan on Amazon
3. KitchenAid 5-Speed Ultra Power Hand Mixer
 10")
Why I Use It: I don’t always want to drag out my stand mixer for a batch of cookies. This KitchenAid hand mixer is compact, lightweight, and has the power to cream butter and sugar until genuinely fluffy without burning out. The stainless steel Turbo Beater accessories cut through cold butter much better than the flimsy plastic beaters on cheaper models.
The soft-start feature brings it up to speed gradually, which means no clouds of flour flying at your face when you start mixing. I cannot tell you how many times I’ve ruined a shirt because of hand mixers that blasted on at full speed.
Best For: Home bakers who want quality without a stand mixer price tag. Perfect for cookie dough, frostings, and whipped cream.
Safety Feature: The soft-start speed control prevents splatter. The cord locks into either left or right side so you can approach the bowl from any angle safely.
Accessibility Feature: It’s lightweight enough that holding it steady during long mixing sessions isn’t tiring. One-touch button releases the beaters instantly.
👉 Check the KitchenAid 5-Speed Hand Mixer on Amazon
Chef Amina’s Hacks for the Best Bakery Style Cookies
Speed Hack: Brown Butter the Night Before Browning butter takes about 10 minutes and then it needs to cool completely before you use it. Do this step the night before and leave the cooled browned butter covered on your counter. The next day, it’ll be solidified slightly, which makes it easier to cream with the sugars. You just saved yourself 30–40 minutes of waiting.
Budget Hack: Buy Chocolate in Bulk and Chop It Yourself Good chocolate chips are expensive when you’re making big batches. I buy large bars of good dark chocolate at Costco or Trader Joe’s and chop them myself. You get a better price per ounce, and chopped chocolate creates those beautiful melted puddles that pre-formed chips just don’t deliver.
No-Chop Hack: Use a Food Processor for the Chocolate If chopping chocolate feels tedious, break your chocolate bar into pieces and pulse it in a food processor 3–4 times. You get roughly chopped pieces in seconds with no sticky mess on your cutting board. I do this every single time now.
Why Do Bakery Cookies Taste Better the Next Day?
Short answer: chemistry. When the dough rests — whether as raw dough in the fridge or as baked cookies sitting overnight — several things happen.
The sugars continue to break down and caramelize slightly, deepening the flavor. Moisture redistributes through the cookie, softening the center and creating that characteristic chewy texture. The chocolate fully sets and the flavors all meld together into something more cohesive and complex.
This is why I always make the dough the day before I want to bake, and then let the baked cookies sit loosely covered overnight. The next morning, they’re at their absolute best. I’ve done back-to-back tastings on this. Day-of is great. Day-after is unreal.
Tips for Storing Bakery Chocolate Chip Cookies
Store them in an airtight container at room temperature for up to 5 days. I put a small piece of bread in the container — the cookies absorb moisture from the bread and stay soft for days.
For longer storage, freeze the baked cookies in a single layer, then transfer to a zip-lock bag. They thaw in about 20 minutes at room temperature, or 15 seconds in the microwave. A brief microwave warming actually restores that fresh-from-the-oven gooeyness perfectly.
Freezing the Dough: I freeze raw dough balls on a baking sheet, then transfer to a freezer bag. They last up to 3 months. Bake straight from frozen at 375°F for 14–16 minutes. No thawing needed.
Frequently Asked Questions
How to make bakery style chocolate chip cookies?
The key steps are: brown the butter, use bread flour, use more dough per cookie (3 tablespoons), chill the dough for 24 hours, and bake at a slightly higher temperature (375°F). These are the things that professional bakeries do that most home recipes skip.
How to make thick bakery style chocolate chip cookies?
Three things create height and thickness: cold dough (chill at least 24 hours), enough dough per cookie (use a large 3-tbsp scoop), and bread flour for a chewier, more structured crumb. Also, don’t over-flatten the dough balls before baking.
How to make chocolate chip biscuits at home?
The process is nearly identical to these cookies. Brown your butter, use a combination of brown and white sugar, fold in plenty of chocolate, chill the dough, and bake at 375°F. The main difference between biscuits and cookies is often just terminology — in the US, a u0022biscuitu0022 typically refers to a fluffy, savory bread. But if you’re after UK-style chocolate chip biscuits (what Americans call cookies), this recipe works beautifully.
What kind of chocolate chips do bakeries use?
Most professional bakeries use a mix of high-quality semi-sweet chips (Callebaut and Ghirardelli are common brands) plus chopped chocolate from a couverture bar. The chips hold their shape; the chopped chocolate melts into gooey puddles. Together, they create the signature look and texture of a great bakery cookie.
Why do my cookies spread flat instead of staying thick?
The most common causes are: butter that’s too warm or melted, skipping the chill time, too much white sugar relative to brown, and an oven that runs cool. See my full section above for solutions to each of these.
Can I freeze the cookie dough?
Absolutely yes. Scoop the dough into balls, freeze on a baking sheet until solid, then transfer to a freezer bag. They keep for up to 3 months. Bake from frozen at 375°F for 14–16 minutes — no thawing needed. I always keep a stash of frozen dough balls for emergencies.
What makes bakery cookies different from homemade?
Size, technique, and quality ingredients. Bakeries use larger portions of dough, rest the dough longer, use higher-quality chocolate, and often add bread flour for more chew. They also tend to bake slightly underdone so the center stays gooey as the cookie cools.
Why do bakery cookies taste better the next day?
As the cookies rest, the sugars redistribute and caramelize slightly more, moisture equalizes through the cookie, and all the flavors — browned butter, chocolate, vanilla — meld together into something more complex. Baked cookies taste best on day two. Raw dough that rests 24–48 hours in the fridge also develops a noticeably deeper, more complex flavor.
Why do bakeries brown butter in cookies?
Browning butter removes water (which would otherwise steam and make cookies puff up more than desired) and develops toasty, nutty, toffee-like compounds called Maillard reaction products. These add enormous depth of flavor that regular melted or creamed butter simply can’t replicate. Once you try browned butter in a bakery style cookie recipe, you won’t go back.
Your Kitchen, Your Rules
The whole point of making these at home is making them YOUR way. Not following some perfect bakery standard that makes you feel like you’re failing because your kitchen isn’t a professional facility.
You don’t need a stand mixer to make incredible big chocolate chip cookies.
You don’t need fancy couverture chocolate or bread flour imported from somewhere special.
You need butter, sugar, flour, chocolate, and the patience to let that dough rest overnight.
You probably already have most of that in your kitchen right now.
Here’s what to do next:
📌 Save this recipe so you have it the next time a cookie craving hits
🧈 Brown your butter tonight so it’s ready to go tomorrow
🍫 Buy one good chocolate bar and chop it up — that one upgrade makes a huge difference
❄️ Make a double batch of dough and freeze half for emergency cookies
💬 Come back and tell me how yours turned out in the comments
Remember: the bakery cookies behind that glass case? A real person made those in a real kitchen, probably with equipment no fancier than what you have at home. The difference was technique — and now you have all of it.
You don’t need a bakery. You ARE the bakery.
Happy Baking! — Chef Amina 🍳
P.S. — What’s your biggest cookie struggle? Mine used to be flat cookies every single time until I finally figured out the chilling trick. Tell me yours in the comments — I read every single one and I love troubleshooting cookie problems more than almost anything.
Recipes that You’ll Love too: